Guest Chef Takeover: Beef Wellington by The Good Doctor
A Beef Wellington how-to brought to you by my clever, overachieving (massive bloody show-off) husband, whose all day effort turned out this beauty, a show of iso-date night dining at it’s most delectable. And now I’m handing over the reigns to the Man in the Kitchen to tell you how it’s done…

Beef Wellington.
How to perfectly package your beef to please your meat loving wife.
A few notes before we begin
This page is all about healthy food and minimum fucks cooking.
This recipe is not healthy. Not even slightly. (So, of course, it’s delicious).
This recipe requires some meticulous attention to detail, especially with the assembly and the beef cooking. A lot of fucks are required to be given.
In summary: this recipe really does not belong on this website
That said it is entirely worth the significant investment of fucks for the end result
Ingredients
700g Beef Eye Fillet - trimmed of all silver skin. You want the central bit that is pretty even in diameter. (You can make it bigger or smaller and just scale the other parts of the recipe accordingly)
Mustard - Dijon, hot English or even Horseradish. Mild American at a pinch. Seed mustard doesn’t work that well.
Cooking oil with a high smoking point (if you’re using olive oil you’ll want the fan on high and the windows open)
Salt and Pepper
Prosciutto - about 8 slices
Puff pastry
Mushroom Duxelles
400-500g mushrooms - any kind, feel free to mix it up
2 shallots - finely chopped
Garlic - about 3 cloves, finely chopped
2 shots of spirit - brandy, whisky, something with some flavour
Salt
Thyme
Olive oil
Crepe
50g / 2oz standard flour
140ml milk
1 egg
Pinch of salt
Thyme
Sauce
1L of beef stock
Dash of red wine
Thyme
Any left over beef trimmings
1 Tablespoon of arrowroot flour dissolved in a small amount of water
Knob of butter
Dash of cream
Cooking Implements
Heavy frying pan
Large open pan
Frying pan suitable for making crepes
Roasting tray
Saucepan
Meat Thermometer - the most reliable option is a remote one that connects to your phone or device. We use a Meater which has proven its worth with perfectly cooked meat every time.
Preparation
Prep Time
This recipe has a lot of steps. But almost all of it could be done as early as the day before.
There is a fair bit of doing something, then putting what you’ve done in the fridge for an hour or so. The prep requires a minimum of two sessions, at least an hour apart. Then there is then a 1-2 hour minimum wait time before putting it into the oven. I did the two prep steps in the morning, then did the cooking step in the evening.
You could make the duxelles and the crepe well ahead of time and put them in the fridge.
Duxelles
Finely chop the mushrooms until they are about the size of large breadcrumbs.
Use a knife if you have patience. Otherwise use a blender. If you use a blender do it in batches so that you can keep the size consistent. And use the pulse function otherwise you will quickly find yourself with mushroom pate.
Start with a cold pan and turn the heat to medium
Add the shallots, garlic, some thyme and a dose of olive oil. Sweat these off GENTLY
Once they have softened a bit add the chopped mushrooms and a good dose of salt
Now GENTLY cook this until most of the moisture has evaporated. You’ll need to stir it now and then
Now add the spirit and stir it around
Cook this off
Place the duxelles in a container and set aside
Crepe
Place all the ingredients in a bowl and whisk them together to form a light batter
Heat a crepe style pan and line it with a bit of butter or oil
Tip about half the batter into the pan to make a thin crepe
Flip it carefully!
The crepe will be somewhat thicker than you might expect, this makes it stronger but it will mean that it takes a bit longer to cook through
Make a second crepe the same size
Beef
Pat the beef dry
Use kitchen paper to work out the size of your piece of beef
Place the beef on the piece of kitchen paper. Put one end of the beef at the edge of the paper. Now wrap the paper around the beef until the paper edges just touch. Remove all paper that is not touching beef.
You now have a template for assembling you Wellington. (You might now choose to cut out a new template the same size, but a bit less bloody). One side is the length of the beef, the other is the circumference. Make sure that you know which is which. (Measure the edges and write down the lengths if you have to).
Season the beef generously on all surfaces with salt and pepper
Heat a heavy pan super hot.
Sear the beef on all surfaces - this step should only take about 2-3 minutes total. You want a sear, you are not trying to cook the beef.
Take it straight from the pan and smother it with the mustard (all over)
Put it to one side
Assembly
This is done in two stages:
1st stage: Everything except the pastry
2nd stage: Pastry
If you thought that making that template was a bit too much effort and you didn’t bother, this step will be hard and you are highly likely to stuff it up.
You still have time. Just measure the length of the cooked fillet with a ruler. Then make a narrow tape out of kitchen paper to work out the circumference, by wrapping it around one end of the beef. Cut the paper where it overlaps. Now you have the dimensions of your beef.
(Yes, that was messy and a pain. But it’s not my fault you were being lazy before. You were warned.)
The different layers need to be slightly larger than your beef’s measurements
Crepe layer: beef length x (beef circumference + 7-10cm)
Prosciutto layer: beef length x (beef circumference + 4-5 cm)
Mushroom layer: beef length x (beef circumference + 2-3cm)
Pastry layer: (beef length + 6cm) x (beef circumference + 7-10cm)
By now it should be clear that the side of the rectangle called “beef length”‘is actually the shorter of the two sides.
Stage One
Lay out two overlapping sheets of cling film about 40-50cm long x 40cm wide
Overlap your two crepes and then trim the edges off to make a rectangle the correct size.
Start the prosciutto layer along the bottom edge of the crepe layer. Lay down you prosciutto slices to make a rectangle of the correct size. The prosciutto is so thin it doesn’t matter if it overlaps a bit.
Spread out the duxelles on some kitchen paper to blot the last of the moisture off. Then spread the duxelles over the prosciutto to make a rectangle of the correct size and even even thickness. About 5-7mm. Again, start all the layers at the bottom edge.
When you are done the first three layers should look like this:

Now place the beef along the bottom edge of the layers.
Bring the bottom edge of the cling film up so that you are rolling the beef up AWAY from you. Make this roll tight. If the crepe is overlapping more than a couple of centimetres you can trim it to length.
Once the cling film is overlapping, hold the sides and KEEP ROLLING
This will help make the roll nice and tight.
Place this roll in the fridge for at least 20min
Stage Two - Pastry
Roll out a sheet of pastry to the required rectangle size
If you need to overlap some sheets use egg wash to help glue them together
Lay out two sheets of cling film the same size as the previous step
Take the plastic wrap off the beef-crepe wrap (did I really have to tell you to do that?)
Place the beef-crepe wrap at the centre of the bottom edge of the pastry rectangle
Wrap the pastry around the crepe, in the same manner as you rolled up the crepe. You want about 3-4cm of overlap so that the pastry ring stays intact when you slice the wellington.
Again, wrap it tight and put it in the fridge for at least a couple of hours
If you want to get fancy you can make a pastry lattice or make some sort of engraving on the wellington. Do this just before you put it into the oven.
Sauce
This is just a simple stock gravy. You can play around with the ingredients according to taste.
Fry up the beef trimmings with some oil and thyme in a saucepan. Once they have some colour add the beef stock and then simmer the whole thing down to about 1/4 of the starting volume.
Then add a dash of red wine and simmer a bit longer.
Strain the liquid through a cheese cloth (kitchen paper will work at a pinch)
Place the strained liquid back on the heat, add the arrowroot and stir until it has thickened. Then add a knob of butter and a splash of cream. Stir until combined.
Flavour Balancing tip - if the wine has made it too acidic, you need to balance that out with some sweetness. A dash of maple syrup has better flavour than just white sugar.
Cooking

This is the hard bit. It is a balance between cooking the beef properly and not burning the pastry.
Pre heat the oven to 220deg Celsius
Place the wellington on an oven tray lined with baking paper, the overlapping bit of the pastry on the bottom.
Brush it with egg wash and sprinkle it with plenty of flakey salt
Put the meat thermometer into one end of the wellington and advance it to the centre of the thickest part of the beef.
Depending on the quality and size of your oven, and how cold the Wellington is when you start, the cooking times can vary pretty wildly.
If you aren’t using a thermometer: Good Luck. And remember, with all the layers between the outside of the Wellington and your piece of beef, plus the fact that it is starting cold, you are more likely to err by having the meat raw and the pastry burnt, than the other way around. (If you’ve made it with the beef warm, then all bets are off)
To prevent the pastry burning on the top, place some aluminium foil lightly over the pastry initially , then remove for the last 15 min or so of cooking so that the pastry will get some colour and crispness.
As a bit of a guide:
I felt that the Wellington in this picture came out pretty much spot-on medium rare. The beef fillet itself weighed about 750g. The whole Wellington weighed about twice that. It had been in the fridge about 2 hours before going in the oven
The oven is on the small side ( probably slightly under the 600mm oven most of you will have) and was set to 220 Celsius on standard (not fan forced).
Using the meat thermometer and the aluminium foil trick, (and ignoring @cleaneatsfromafilthymouth ‘s increasingly persistent “this meat will be dry and ruined” comments) it took about 50 minutes from going in to coming out, and a further 10 min of resting. (Note this is a LOT longer than most of the recipe books will tell you. KNOW YOUR OVEN!)
The meat will continue to heat up for a bit whilst it rests, so don’t worry about removing it from the oven before it hits the ideal temp (about 53-57°C). If you aren’t careful you will over cook it.
Slice it at the table for a bit of theatre.
Serve with something green and a glass of something red.
Not super technical but requires attention to detail
Good Luck!

The finished result
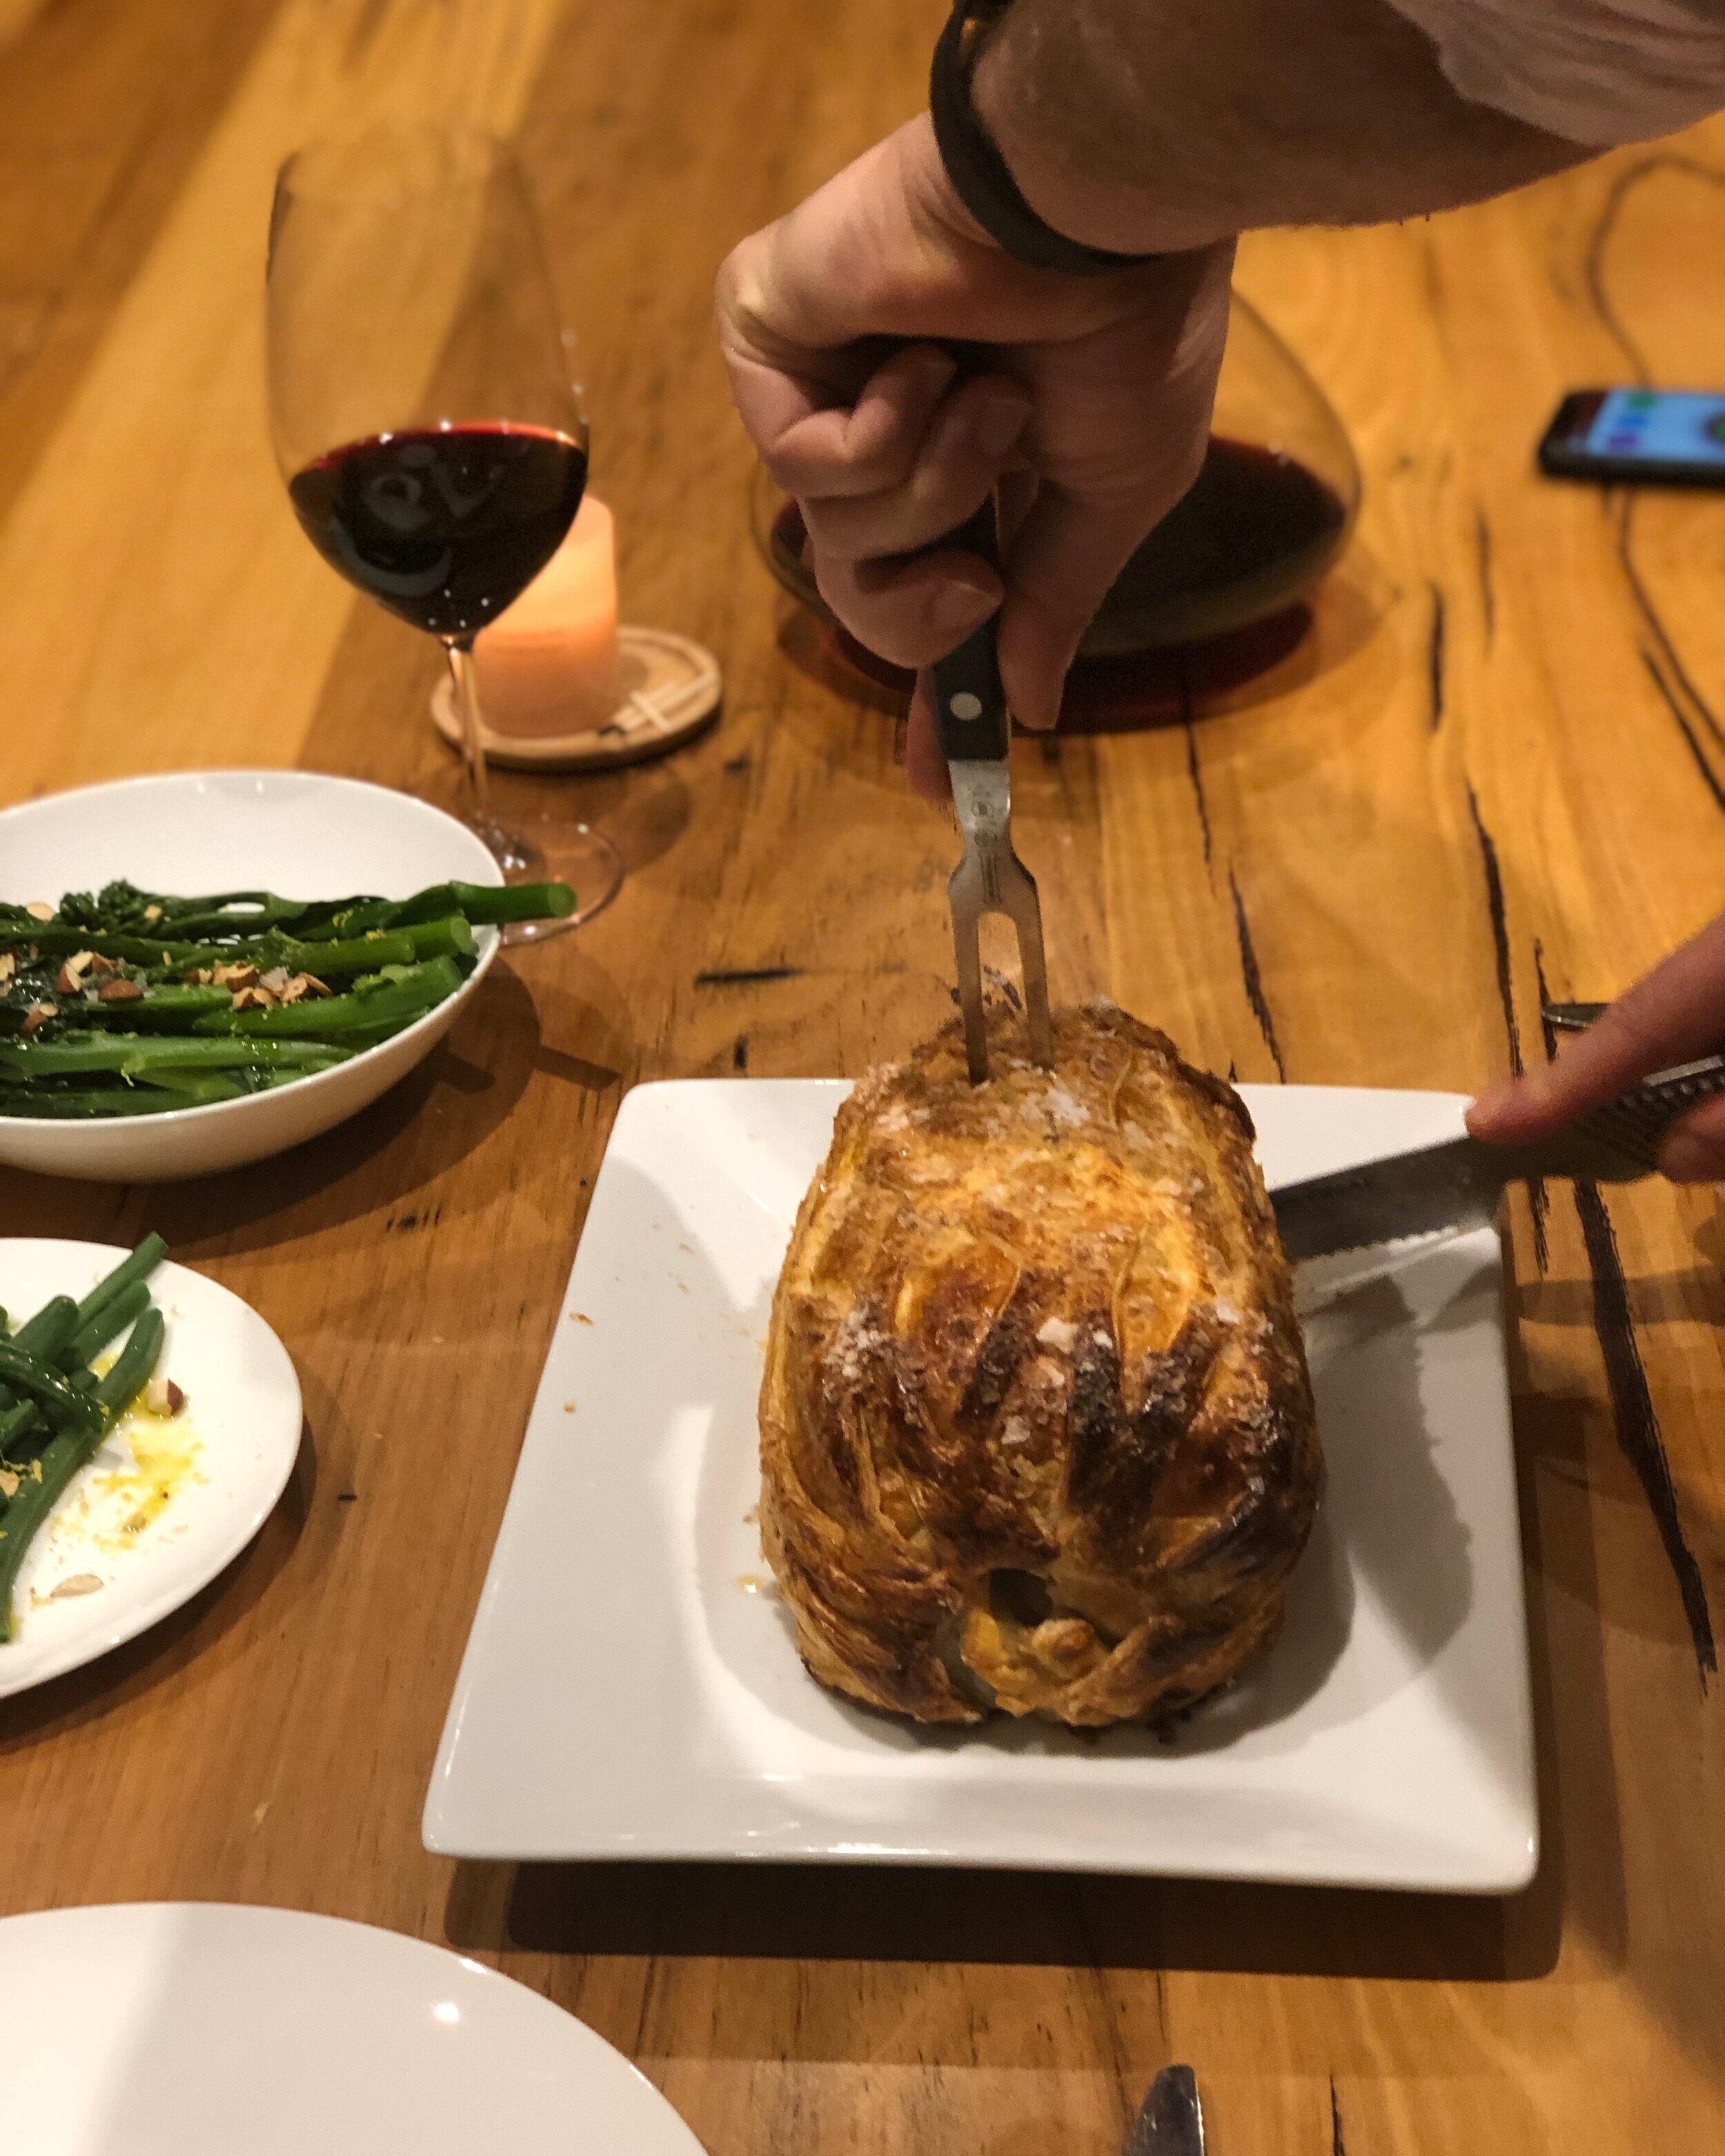
The moment of truth…
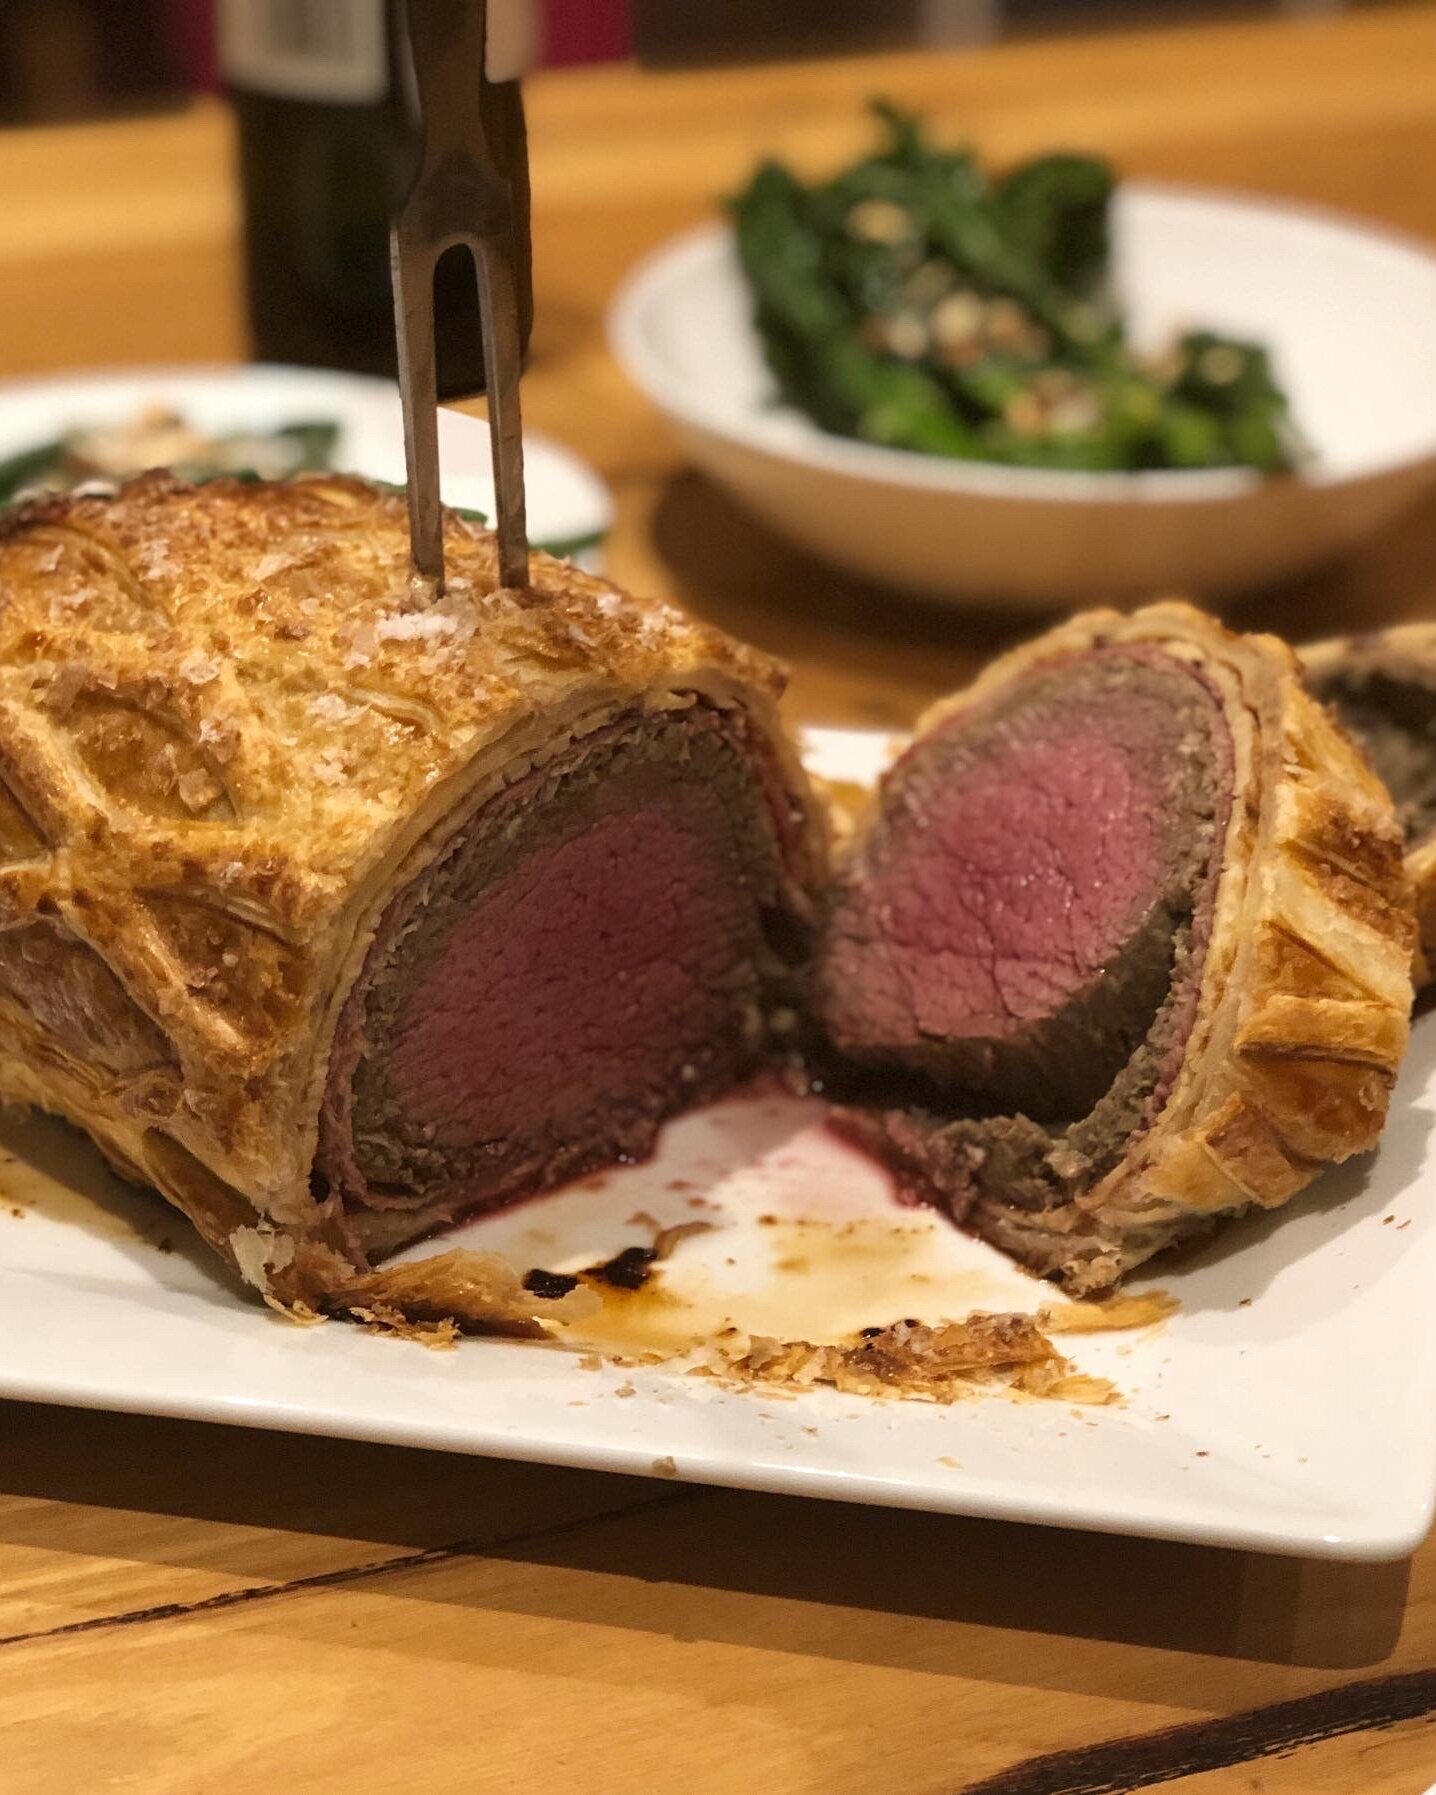
The money shot

The suitably impressed spouse